Category Archives: Electricity

High-efficiency Work Lights

I love tinkering and building things, especially after work. This means working indoors, and good light makes for an enjoyable, productive and safe workplace. Usually it is better to have multiple sources leading to less shadows but sometimes you need one very strong light source. Just like for bulbs that are too small, finding efficient replacement for bulbs that are too large can be hard. Fortunately I found this CFL bulb by Ecosmart that for 68 Watts generates more light than a regular 300 W fixture.

EcoSmart 300W CFL Bulb

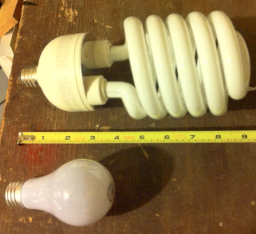
The bulb is quite big – almost comically big – as compared to a regular bulb, as you can see in the picture below. Make sure you are planning to put it in a fixture that will fit it!. But it gets the job done and I can use it for a handful of hours without blowing my daily energy budget.
300W CFL Work Light. Yes, I have kept one incandescent bulb for nostalgia purposes and reference pictures like these.Of course, as with any CFL, one has to be very careful not to break them and to recycle them appropriately because of their Mercury content.

.

I would love to hear stories of others making their work lights more efficient. I have seen, but haven’t tried these other work lights which are LED based but because of the cost and form factor – I just needed something to put in a bulb socket.


Measuring power use on 240V appliances

In the USA large appliances like clothes dryers or electric car chargers are built for 240V. I happily have used the Kill-A-Watt EZ for simple measurements, but 240V appliances can’t be measured through it. The TED5000 I have measure whole-house electricity usage, but I wanted to update my chart of where power goes in my house (electric power, that is). I want to get an updated picture of what % goes to heating, fridges, etc.

The TED5000 could be a great option but having to install a new MTU and CTs seemed complex, especially once it comes to aggregating the data into only one gateway. I thought splitting the 240V lines and feeding one live/neutral pair in a Kill-A-Watt… but not knowing more about the internals of the Kill-A-Watt I felt I may introduce unnecessary safety risks.

Instead, I built my own portable 240 Volt power meter:

Parts

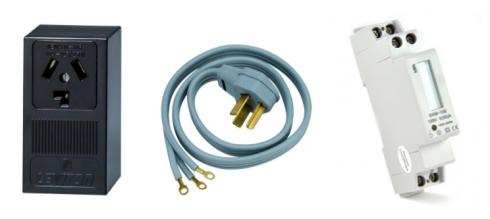
  • Get a Dryer cable (there are differrent models, older 3-prong and newer 4-prong plugs with separate ground and neutral connections. I got the type of cable I needed). Example
  • Get a surface-mount receptacle for the same type of cable you have. Example
  • Get a EKM DIN-Mount power meter

With these elements in hands I assembled a simple 240V “extension cord” that has a remote display to measure the power going through it. The remoteness of the display (a design idea from the Belkin Conserve meter that is otherwise useless) is useful especially with 240V appliances where the outlets are inaccessible, behind heavy stuff, plugs are huge and hard to maneuver in cramped conditions, and you generally don’t want to be messing around with them.

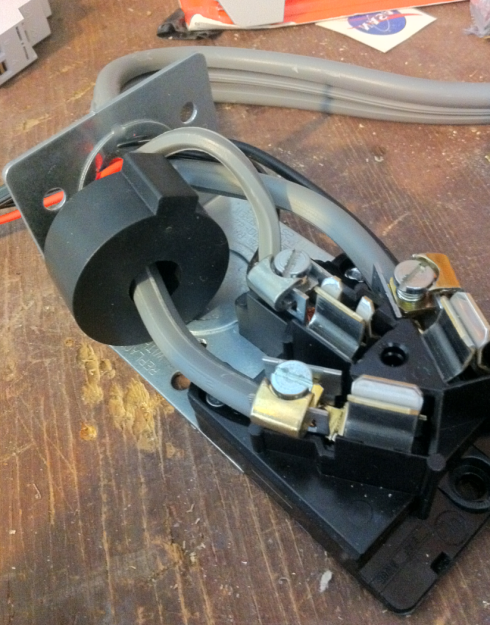
 The assembly was simple. I got lucky since the CT of the EKM device fit nicely in the surface mount box with no stress to case or cable.

Since it measures current going only through one live lead, the actual power is twice the displayed value in the meter. Unlike many other countries where the use of 2 out of 3 phases at 120deg phase is common, in the USA higher-voltage appliances are powered with two counter-phase live lines of 120V each, so getting the real power used is a simple matter of multiplying by 2 instead of by square root of 3.

This meter is handling 240V with high currents so it is important to do a careful job if you decide to build your own. Doing 240 V in Canada is illegal if you are not an electrician and you can void your house insurance. You can hurt your loved ones, yourself, or your property if you don’t know what you are doing (this is true for everything in life, however).

The EKM meter gets the current reading from the ring ammeter in the outlet, and reads the voltage through a couple of extra cables.

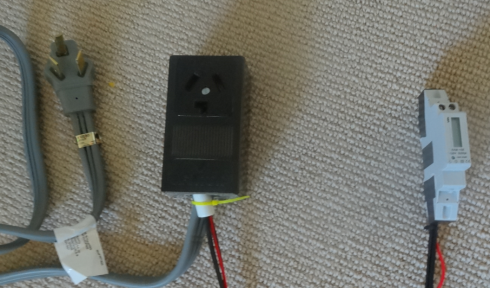
Here is the end layout before getting the EKM meter and cable into casing and protective stuff:

DIY 240 V power meter

The meter reads cumulative kWh so you need to keep a logbook of when you started and stopped measuring what. It tracks kWh to 2 decimal places so it’s more than precise enough for the use we are giving it.

Portable vs Breaker Panel metering?

I like the meter I built, for its portability, simplicity, and that I can lend it to friends.

But after getting some basic measurements I am considering installing the EKM as an add-on to my breaker panel. This will allow me to periodically re-wire the CT onto different circuits. I may decide to invest in a better meter – EKM has a very compelling product line– , but I have pushed my electricity consumption so low already that I would need to expect to discover significant in the data obtained in order to recover the cost. After all, the basics save most of the money.

But if you are starting the process I went through improving your house’s electricity efficiency from the beginning, or you want to discriminate between appliances such as electric cars, and you care about measuring stuff, I would highly recommend installing one of EKM’s smarter meters near the breaker box and investing in a couple of clamp-on CTs. If you don’t care about fine-grained measurement just follow the main improvements and use your bill to track improvement.

Feel free to leave comments & questions below!


Replacing 40W Spot Bulbs with 6W LED Spots

I’ll do a couple of quick posts to share how I have improved efficiency in situations/fixtures that require non-standard or hard-to find bulbs.

40W Spot bulbs

The 40 W spot bulbs are used in recessed and small table lamps. With my adapter + bulb contraption, the spot light even looks nice (IMO)These are hard to find in CFL because of their small size. I couldn’t find a direct replacement that had enough lumens to be any good or had a good temperature.

What I did is I bought some LED GU10 bulbs that are smaller. The GU10 plug looks like two fatty prongs that are intended to be twist-locked in place (see the pictures). I then got a ceramic adapter that has a normal bulb screw on one end, and a socket for GU10 plug on the other.

Despite this looking weirdly "long", the overall length and diameter is exactly the same as those stubby 40 spot lights.With that, I could adapt some EcoSmart bulbs and they worked great. Here they are in HomeDepot but with a different packaging than I had them (I bought them in little cardboard boxes, and Amazon doesn’t carry them as I write this). I wish I hadn’t given away the old normal bulb to give you a comparison image – when assembled, the picture of the combined bulb+adapter to the right looks disproportionately long, but the overall length is less than a 1/8th of an inch longer than the original.

 The adapters are not cheap (I got them at Amazon for $5.95) but worth it. These lamps tend to spend a couple of hours on in the winter. I got rid of 2 bulbs, so 2 x 40W= 80 W went out and got replaced it with 2 x 6 W = 12W. It repays itself in 5 years with calculated guesstimates.

Finding a bulb that I liked wasn’t that easy – the Philips brand was both too bluish,weak and had a weird, diffuse shadow. These are brighter but 3000K. I would have preferred 2700K for a mellower, warmer look. Still these look great and given how much they are used definitively worth it.


Replacing Halogen Recessed Lights with LEDs

For my house, this LED bulb became the star as the house has a lot of small recessed lights in high-traffic areas.

All in all we have replaced 34 50W halogen bulbs (that’s 1700 W spread between the kitchen, stairs, hallway and main bedroom) with 29 of 7W Philips LEDs (to 203 W). Just swapping the kitchen lights and hallway/stairs lights made a measurable difference. In this area of the world, days are short in the wintertime and you need lights on until 9AM and from around 4:30 PM. The halogen bulbs required 8 TIMES more electricity.


I liked these Philips bulbs after trying others because of:

7W LED Bulb from Philips

  • Temperature: 2700K – a nice, warm color suitable or ambient lighting.
  • As bright, or maybe brighter, than a 50W halogen (I’ve done the experiment and folks can’t tell them apart without seeing the actual bulb)
  • Only 7W
  • Dimmable
  • The 3-element LEDs actually create a nice shadow pattern against walls, making the light a bit more diffuse
  • When installed, they look nice, even if a bit UFO-ish (but I don’t care much)
  • They are not too expensive compared to other LEDs in the same factor (I’ve found them between $26 and $22 – I mostly got them at Home Depot)
  • I also used the opportunity to remove some bulbs that were making lighting too uniform. Now light follows social function of the space better in the family room.
Philips 418426 7W

For my “good” goal of 16 kWh/day, having a kitchen circuit with 10 x 50W for 3 hours was blowing 1500 kWh – that’s just one room in the house eating up 10% of the energy budget!

What’s the Return of Investment?

LED bulbs are not cheap and it’s not where you start with an energy reduction effort, but I saw an immediate difference in the electricity use in the bills. Since these are recessed lights, having kill-a-watt meters is not possible (how long until in-wall switches and outlets report their use via wifi?) so there is a little bit of interpolation going on.

I spent a lot of my ‘efficiency’ budget on these bulbs (once I had improved house thermal insulation, and done other basic improvements). It will take around 10 to 15 years for a recovery on the investment assuming the bulbs live their advertised life and assuming some 3hs of daily use. It would take 23 mega Watt-hours to keep the halogen bulbs on, and they would need many many replacements along the way. With these LEDs it’s buy once and 3200 kWh using the same assumptions. Even though my energy sources are now somewhat renewable, they still have a carbon footprint larger than zero, so using less Watts is still good beyond the money.

Remember our economy of fossil fuels is vastly distorted due to externalizations and subsidies so the money-cost of burning coal or gas is quite irrelevant to calculating the real ROI of the bulb. Of course the cost of the bulb itself is lower than it should be too, because of the equally artificially lowered costs in its manufacture and transport – but the difference between the manufacture of different sorts of bulbs (CFLs, LEDs) is so little when done at scale so that difference evens out if we are doing comparisons between bulbs (comparing these bulbs to light from candles made of beeswax in your own backyard is a very different exercise, but I don’t have that luxury). I haven’t seen a great supply-chain analysis of the material, energetic and human costs involved in making and transporting different bulbs; including data for fossil fuel and rare-earth elements, so a lot of externalizations are hiding there; but the ones that I have seen lead me to believe it ‘makes sense’ to go with the LEDs in the larger scheme of things – their 5x + longevity alone offsets a lesser increase in complexity and reliance on mercury. It is a complex landscape with no map…


Installing the TED 5000

Installing the TED 5000 to monitor your electricity use is easy and it does not require you to tinker with your mains cables- but does require to clamp the meters around those cables. Read here how I use it in conjunction with Kill-A-Watt EZ to understand and improve electricity use. I have experience working with high-power electric installations so it was a snap to do for me and I am familiar with safety and electricity.

The foundation of the TED5000 is two clamp-ammeters that measure the current flowing through the main cables powering your house. They can measure this without touching the circuit by measuring the electromagnetic induction inflicted on a ring caused by the alternating current in the cables. The “clamps” are rings that you can open and close around the cable without having to touch it. You use two clamps as most likely your house receives electricity via two AC ‘phases’ Then, the TED5000 MTU connects to a breaker on each ‘Phase’  directly, and to the neutral bar, so it can measure voltage. It multiplies voltage and current, to get a power reading.

Here is what the overall map of the installation looks like:

The setup of a TED5000Basically:

  • The MTU has clamp-on ammeters which go on both phases of your mains cables going into the switch box
  • The MTU has 3 other cables: one goes to neutral, and other two that need to be connected to a line of each phase. This allows it to measure the voltage, as well as transmit data out via a signal sent over the power line.
  • A “gateway” box plugs in to an outlet on the same phase as the signal cable, which reads the data and has a computer network ethernet port to share the information out.

These are the two TED5000 current meters clamped at the top of the mains
Setting up the MTU

Here are some tips to set it up. Some are common sense and others are from experience. Needless to say be careful, think ahead and rehearse mentally when you are doing something you are not familiar with.

  • Preparation is important: make sure you read the TED 5000 installation guide and you understand what to expect inside your main box.
  • You should cut power to the mains.
  • You may want to wear insulating gloves and shoes anyways
  • Rehearse the operation mentally and have nearby some screwdrivers, labeling material. I used some insulating tape to tidy up the cable layout too.
  • Screw in cables firmly but not so tight you can damage the ends. Consider the way screws turn so that they clamp around a cable inwards and not ‘eject’ it when tightening them.
  • Be tidy about the cable layouts. Don’t stretch, tense, or force things in places they don’t want to go.
  • Don’t leave loose ends.
  • Label the switches you connect your TED leads to. If you turn those off, the MTU will stop sending data to the gateway, which will continue to give you a false ‘steady’ reading, and it may confuse you if you are measuring as you flip switches on and off.
  • Make sure you connect the data line to a breaker that has outlets nearby! Choose a nearby outlet before starting.
  • Don’t leave the MTU dangling from the cables, squeezed against a door or panels. Again, be tidy.
  • Check things before closing up. Don’t leave tools inside.
  • Give a shout out when powering on and off.
  • Make sure a well-meaning soul won’t turn on the mains while you are working.

Setting up the Gateway

The Gateway is just a little device you plug in to an outlet. Since it communicates with the MTU via power line communication  you need to plug it into an outlet controlled by the breaker switch you chose to install your MTU communication line in the mains box. It can be frustrating if you don’t get a signal at first. I had to try on two different outlets until I got a strong reliable signal. The closer it is to the mains (physically) the better as the power line communication degrades with distance. This can be challenging as usually the mains is in a basement or somewhere far from ethernet cables.

Enjoy the data!

Once it’s set up you can use the TED5000 web interface or one of many smartphone apps (I list mine here) to look at the data. You need to discover the IP address of the TED device. I happen to be handy around network configurations so it was easy for me, but the TED 5000 materials give you clear instructions to follow and helper applications to do it yourself.

If you buy the TED 5000 from a store it’s likely you’ll get the kit which includes a portable display you can use anywhere in the house. I don’t have one so I can’t review it or give you tips about using it.

I also chose to expose the IP address of the TED 5000 on the internet so I can access the information directly anywhere with a connection.


Enjoy your measurments!


Measuring Energy used with TED 5000 and Kill-A-Watt

You can improve a lot of things about your energy consumption by following a few rules of thumb, but at one point or another you’ll need to measure your use to know where to place your efforts. Your utility bill is a great tool, and it gives you a high-level overview of trends, but it won’t help you change your behavior in real-time, pinpoint problem areas, or dispel assumptions.

By tracking things better you can also decide where it may be worth it to install some smart control (a timed switch or outlet, a presence sensor, etc), or if upgrading an appliance is worth it energetically. In this post I will share some some of the approaches to measurement I’ve taken for electricity use.

  • TED 5000 for house-level usage and overall patterns
  • Kill-a-watt EZ for appliance and outlet-level analysis.

TED 5000

The TED 5000 (http://www.theenergydetective.com/)is a small simple device that installs in your main electricity junction box and measures current and voltage in real-time. This allows it to compute power used and keep track of it over time.

You install the measurement unit (which they call “MTU”) in the junction box, and then it sends out the measured data to a box plugged elsewhere in the house which is called a “Gateway”. This gateway has a network cable interface and you can plug it into your ethernet. The Gateway exposes a web page which you can see in your browser, which shows real-time and aggregate information.

The TED 5000 Dashboard, accessible by browsing to your TED Gateway’s IP Address

I have found TED 5000 (TED is an acronym for “The Energy Detective” and a not-subtle resemblance to the TED talks logo) to be useful for:

  • Real-time checking of how much appliances are using when they are on or an average over time.
  • Good for real-time tracking that allows me to hunt down phantom/vampire/leech devices that eat up more energy than I thought
  • Seeing how my hourly & weekly electricity usage patterns can be changed.
  • Getting really annoyed at appliances that I can’t turn off e.g. refrigerator.

I have not found it useful for:

  • An appliance-by-appliance analysis of my usage, because of the way it measures and tracks electricity, and also because it’s appliance “Load Profile” scheme seems to mix up my house appliances a lot.
  • Everyday behavior adjustment based on usage and projections – I am finding external apps are more likely to do this for me.
The TED 5000

Mobile Apps for the TED 5000

The information can be seen in a bunch of mobile apps which connect directly to your TED 5000 Gateway, amongst which Mirawatt T5K (http://ted.mirawatt.com/)is the one I liked the most (I use an iPhone, there are similar apps for Android and possibly Windows Phones). It is only worth the $4.99 price because it has no competition as far as user experience goes. (It is not spectacular, however. It is just the least bad of the bunch). Others I didn’t like as much were TED-O-Meter or iTED. These are free, so yay & kudos for the efforts to those developers. To access the information outside your home via your mobile network you will need to configure your internet router to expose the TED Gateway IP address directly on the internet.

Cloud Services & Mobile Apps

PeoplePower (http://peoplepowerco.com/)is a relatively new effort that provides an internet service and a mobile app to access your data. The TED 5000 Gateway stores some usage data, but PeoplePower promises to save your data for a longer time on a real server and its mobile app has more features around projecting and setting goals for your electricity use. It’s headed in a promising direction, and they are also making some steps in gameifying environmental behaviors.

You configure the service by telling your TED device to “post” data to their website. Just follow the instructions you get when you sign up. If you run into any issues or the TED configuration is acting up on you, just email them- I can attest their technical support is excellent.

Kill-A-Watt EZ

The Kill-A-Watt EZ is a great little device. It tracks the energy usage over time and displays real-time or accumulated information. It can show Watts, KWH, or $ (you have too tell it your electricity rates).

I have found it useful for:

  • Measuring the overall electricity used of a device that has complicated use patterns (e.g. my workstation, where I have multiple monitors, and I use it more of it some days than others)
  • Keeping ongoing track of devices that have “spikes” of use. For example, knowing how many watts my microwave oven uses when it’s on is less interesting than knowing how much energy I am using in it over a month.
  • Measuring specific outlets I want to track for other purposes like the charger outlet to the battery of my car, which runs off a standard 120V outlet. I want to track if my battery recharging becomes less efficient over time, and have concrete data for EV naysayers who say it uses more electricity than it’s worth it in gas.

I have tried other devices like the “Belkin Conserve Insight Energy-Use monitor”. It has a nicer physical design but it’s almost a waste of money when it comes to measurements, because of the way Belkin chose to aggregate and display the data. I’ll stick with the Kill-a-watt.

I have a couple of Kill-A-Watt unit (one fixed for the car charger and one that ‘roams’ around the house as I make week-long measurements). The next obvious evolution is to have these meters transmit data via wireless to services such as PeoplePower’s. I’m sure an enterprising soul with a Kill-A-Watt, some micro controller  knowledge or a new ElectricImp and time to invest in a cool project could take the output of the former and beam it via wireless provided by the latter. Sounds worthy of a Maker Faire project.

Note that none of the above help measure electricity used by built-in lamps or lighting systems that you turn on and off via a wall switch (unless you wire things yourself). Maybe one day soon light switches and outlets that automatically measure, store , and forward usage patterns will become economically viable. Some smart digesting of the ensuing data deluge could provide actionable and personalized tips to do more with less.

Use Less with Smarter Controls

In general, to reduce the footprint of a resource I look at the following strategies:

Smarter control is really a means to reduce demand or increase efficiency, but I like calling it out as it forces me to think of new areas of improvement. Smart controls avoid the use of resources when they are not needed because of real-time environmental conditions, they allow remote or automatic control, give you more fine-grained options on how to use a resource, and can even learn your behaviors and nudge you into less demand. The difference between a control and just a sensor/meter is that it does stuff.

Examples of some controls I have installed:

Gas & Electricity: Nest Programmable Thermostat

Nest Controllable Thermostat

Nest Thermostat

This is the energetic rockstar of my house, and a design beacon for the growing industry of smart controllers. Based on my data, I can attribute an approximate 20% on heating gas savings this last winter to this device alone. It has been the item with the highest energetic ROI-per-dollar in my house since. The Nest thermostat allows me to control my heating remotely via my phone, learns common patterns, turns of unnecessary heating, and nudges my behavior via little ‘green leaf’ icons and monthly points I can accumulate, gamefying my energy conservation. It’s worked so well it will get a bunch of blog posts on its own.
Nest’s website

See the Nest thermostat and reviews on Amazon.

Electricity: Belkin Conserve Socket with Energy-Saving Outlet

Belkin Conserve Socket with Energy-Saving OutletThis smart power strip senses if a ‘master’ outlet is being used, and if not, shuts off the power to most other outlets. I use this strip  to reduce “phantom draw” from peripheral devices around my computer, for example. USB Hubs, speakers, and other accessories are all plugged into the secondary/slave plugs. When I take my laptop away or it is not drawing power from the source, all these devices loose their source power within a few seconds.

Electricity: Belkin Conserve Outlet with Timer

This small plug adapter from Belkin has a built-in timer that can be set to 1/2, 3 or 6 hours. Press the button, and the outlet will deliver power for that long. It’s that simple. I use this for:

  • My external monitors. In addition to the power strip above, it just turns all of them off every 3 hours. If I’m in the middle of something I just click them back on. The timer also takes care of external monitors when the computers’ driver for some reason or other forgets putting them to sleep
  • A power strip that feeds to electronics I rarely use but for some reason tend to stay on like printers.
  • Our home theater assembly. After 3 hours, it turns all the gear off (except a network switch and a Roku, which are fanless solid-state devices that draw a few watts combined combined). I also plugged the Xbox is also on a non-timed outlet, for long downloads to continue independently, but the Xbox is pretty good about turning itself off when it should.

Water: Timed/Regulated Watering

Solenoids (electric faucets) controlling outdoor irrigation

Solenoids (electric faucets) controlling outdoor irrigation.

I’m on the fence on this one, but I’ll include it as it touches upon using smarter controls for water conservation.

I am not a fan of using mains water for irrigation and I believe automated timers have done more harm than good in conserving water (I haven’t seen data either way, but it’s a strong hunch), even with the growing popularity of drip irrigation. Anyways, I recently wired some solenoids (water taps that can be controlled via electricity, in this case 24v) on a couple of irrigation lines and hooked them up to a timer device. It stays off and we use it as a manually activated timer on seldom occasions. If I could hook it up to soil humidity sensors I would feel better about leaving them in automatic. I guess this “Smart control” isn’t so smart yet. Maybe it will be an Arduino project for a rainy weekend to improve this. It rains so often here that capturing some of that would make the most sense.

Another example of a smart control for water conservation would be those simple toilet-flushing buttons that give you two options to use more or less water based on what needs to be flushed. It’s simple but I haven’t installed these yet.

Conclusion

Smart controls can help us reduce consumption and increase efficiency. Sometimes they may seem expensive but if you make sure to  keep measuring your gains you may be surprised! There are many other ways to reduce, reuse and conserve resources that don’t require you to buy anything, but these controls are an example of technology playing a good role in helping improve our lives and the planet.


Cheap & Simple Tracking of Your Energy Consumption

Coming up with measurable goals is essential to achieving most sorts of things. It is even better when you can measure partial progress towards your goals, as in “you are 10% closer” – as opposed to “you made it” or “you haven’t” measures.

Fortunately in measuring your energy footprint you have simple ways to get important measurements. Specifically, you can treat your gas and electricity bill as a meter that tells you how closer or farther away you are from your footprint goals. Water bills are also good, if they measure your individual consumption. Other bills (such as the quantity & quality of your trash) are harder to use as good “meters” to set goals against as large utilities charge “by the bin” or flat rates.

My utility bill is full of useful information such as the following.

My utility is courteous enough to include a trend graph for consumption for the year; and a comparison to last year’s data if available.

Data in the bill is very raw- it does not take into account things like:

  • Changes in my patterns – for example, did I travel out of town for work? Maybe I had out-of-town visitors that stayed at home for some weeks?
  • Environmental changes – Especially the outside temperature and average duration of the day have a huge impact. Here in the Pacific Northwest, the longest day of the year is 16 hours long… and the shortest is 8h 2o min. That makes a huge difference on how long my lights are on or off, making it harder to compare one month against next.
  • Accidents – did I leave the lights on? Maybe I forgot to close a window or a door and your heater strived to warm the Great Outdoors for a full winter day ? One bad day can throw your monthly average off.
What I do is every time I get a bill I just copy the information from the key boxes and the overall price into a spreadsheet. This allows me to get some pretty charts and graphs like the following:
Electricity, Gas and Water over time

Charting your utility bills gives you critical feedback in reducing your footprint. The y-axis units are % of max to be able to compare different values. The latest upswing in electricity (red) has me puzzled, but I think I know what caused it.

I think utilities should expose an API or let you download your data in some easy to process format, like a CSV or spreadsheet that can then be imported into Excel or Google Spreadsheets. Of course, the use of Smart Meters that report their data realtime would be great, but a lot of efforts in that direction are still not doing great. In the meantime, periodic data entry, and appliances that report their own consumption will do.

Try doing this with your own utilities, you may learn something new!


More Details on PSE Green Power

I got a great piece of feedback from Heather Mulligan, PSE Green Power Market Manager, about how the extra cost of the Puget Sound Energy Green Power program is applied to help the financing of new stations. She says:

The extra cost is used to purchase Renewable Energy Credits (RECs), which represent 1 MWH of actual energy production. RECs place a monetary value on the environmental attributes associated with renewable energy generation, thus making it easier for the developer to get the necessary funding to build their project. So in that sense, RECs do make it easier to get the startup capital needed, which does help to encourage the creation of more small & renewable generation stations.

– Heather Mulligan, PSE Green Power Market Manager

What is a REC?

After researching the good and bad side of the REC system, I came to the conclusion that it is just a token-based market for “green Megawatt-hours”. Trying to put it simply:

  • If I put up a wind generator, and I generate 1 megawatt for 1 hour, I have two things I can sell – a megawatt-hour (MWh) of electricity, and a REC, which is worth some cash (I estimate around $10 per REC).
  • PSE sells electricity to people. They want more of it. So PSE buys my megawatt.
  • Some people want “green power” so they also “buy” RECs from PSE which are worth a bit of cash.
  • PSE has to buy a REC from my mini-utility to meet these people’s demand, or fail audits.
  • By using the RECs (and the associated auditing that comes with this ‘virtual good”), the consumers can say “I want renewable electricity” – and have to put their money where their mouth is – and PSE has to get them from somewhere.
This great diagram from BEF explains the flow:
How a Renewable Energy Certificate (REC) Works (by B-E-F.org)

How a Renewable Energy Certificate (REC) Works. See the great explanation at http://www.b-e-f.org/business/products/recs/

Common misconceptions

Some folks claim this distorts the market. That is true. But the market is already VERY distorted as it is: with externalized costs (which every non-renewable generator has tons of), large R&D and supply-chain subsidies (which large nuclear, hydro, etc. projects have), and a central controlling distribution entity consumers can’t choose (which almost every utility company is). With RECs I have a way to express my demand, so for me it removes some net distortion.

I also see claims that purchasing RECs are a way to offset your carbon footprint. RECs are not carbon-reduction tokens. They are a token of demand of renewable electricity, and I believe you can’t buy RECs beyond the amount of Megawatt-hour you consume. In addition, some renewable energy sources are still carbon positive (that is, they still throw some previously captured carbon into the atmosphere, even if at lesser rates and from smarter sources than, say, coal). Therefore buying RECs won’t offset the emissions of your car.

Sign up!

I know this sounds like an ad – it is not- but there are few things that you can do that are as smart, cheap and easy to reduce your energy footprint as signing up for the PSE Green Power energy.

Just log in here: http://pse.com/savingsandenergycenter/GreenPower/Pages/For-Homes.aspx#form

and choose 100 percent. If you don’t do it, I would love to understand why, and how you feel about it.


Practicalities of testing your LED bulbs

Here are my tips for the logistics of testing many LED bulbs as you find the light that works for you:

Purchasing & Returning LED lights

  • Plan to test many bulbs. Return the losers, keep the winners. Don’t feel shy about returning items you don’t want. LEDs in bulk can be an investment, and everyone would rather get a return of 1 or 3 bulbs one week after, not 30 a month later.
  • Easy returns implies getting them from a brick-and-mortar store nearby, if possible. Try to re-use trips to the store and back.
  • Buy many bulbs of the same type you are trying to replace, and test them shortly one after the other. It’s hard to remember “what something looked like a week ago”. Buy some with a bit of variation – for example, buy a bulb that is slightly brighter and another one slightly dimmer than the one you are trying to replace.
  • Keep the boxes and packaging materials of all the bulbs you are testing – even when committing to one particular brand or model, I kept the box around for a few days just in case. You don’t want to be stuck with $25 items you don’t want.
  • Likewise, keep the receipts if needed. Home Depot will allow you to return items by just swiping the same credit card you used to buy them.

Testing LED lights at home

  • Test in the actual location where you want to see the bulbs work – e.g. in your living room ceiling, not in a bulb receptacle at eye level in the garage.
  • Keep the new bulbs installed for a couple of days. Test at day and night, so you get to the point when you are not thinking about it or looking at it on purpose.
  • Check in with your spouse and family about the conclusions. They may feel differently about what’s better.